A successful Siding Installation Long Island not only protects a home from the elements, but it also adds to its resale value. But a bad installation will leave a home vulnerable to moisture problems and air leaks.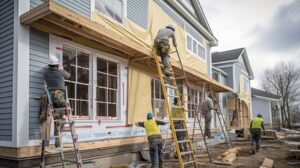
Thankfully, mistakes can be avoided with the right planning and preparation. The following tips will help ensure a smooth project and long-lasting protection.
As a homeowner, it is your responsibility to choose the right materials for siding installation that will protect your home, improve its appearance and increase its value. There are several considerations to weigh, including aesthetic preferences, climate conditions and maintenance requirements. By understanding the advantages and disadvantages of each option, you can make an informed decision that aligns with your goals.
Wood panels offer a natural, timeless appeal and are available in a variety of styles. They are also a good choice for those interested in energy efficiency, as they provide insulation that can lower your heating and cooling bills. However, they aren’t a great choice for wet climates because they can be vulnerable to mold and rot.
Vinyl and aluminum are popular siding options that are affordable and require very little maintenance. They are also highly durable, which helps to keep them looking new for a long time. Unlike other types of siding, they do not attract insect pests and are resistant to moisture and sunlight.
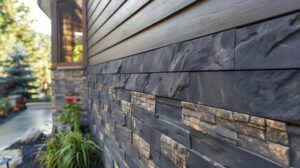
Brick is another popular siding option that provides a rustic, classic look. It is also extremely durable and has fire resistance for structural longevity. However, it is a heavy option and requires more extensive labor than other types of siding.
Stucco is a versatile siding material that can be used to achieve both contemporary and traditional looks. It is composed of cement, sand and water and may have an acrylic finish. Its durability and low maintenance costs are appealing to homeowners. However, it is not a good option for wet climates because it can be susceptible to mold and mildew and must be regularly repainted.
When choosing a contractor to complete your siding installation project, it is important to ask about their experience with different materials and their process for dealing with unexpected issues. You should also find out if they have any certifications and whether their work is guaranteed.
Choosing the wrong type of material for your siding can cause a number of problems, from improperly sealed seams to damage from rain and wind. It is essential to hire a professional who will help you make the right decision for your property and budget. They will also provide expert installation, ensuring that your siding is properly installed and meets all applicable standards.
Preparing the Surface
The underlying surface of your home needs to be properly prepared before the siding can be installed. This includes repairing any damaged areas, applying a moisture barrier (such as house wrap), and making sure the sheathing is level and plumb. It is also important to make sure the trim is properly installed, as well as caulked and sealed. This not only provides a beautiful finish but will also protect against water infiltration and mold growth.
Once the sheathing has been prepared, you are ready to start installing the vinyl siding. The first thing that will need to be done is to measure the width and length of each wall that you will be covering. This will help you determine how much material is needed and will ensure that you don’t run out of materials during the installation process. It is also a good idea to take measurements of any windows, doors, or other openings in the walls to account for them as well.
When you are estimating the amount of vinyl siding that you will need, be sure to include any overlapping areas or corners as well as any additional trim or fascia that may be needed. It is also a good idea to add an extra 10% or 20% to your total to account for any waste that may occur during the installation process.
Before you begin installing the new vinyl siding, it is a good idea to unpack and acclimate it to your environment. This is a crucial step that should not be skipped or cut short. The acclimation period helps to minimize or prevent warping, cupping, and buckling of the panels during installation.
While you are preparing the area for your vinyl siding installation, it is a good idea to cover any plants or flower beds that could be exposed to debris or dust during the process. You will also want to remove any outdoor furniture or decorations that could obstruct the work area. Lastly, you will want to cover any patios or porches that you would like to remain in use during the project with tarps or plastic sheeting to protect them from falling debris or paint.
Installing the Siding
Whether you’re hiring a contractor or DIYing, the type of siding you choose will play an important role in your home’s look and functionality. It should also be durable enough to resist damage and last a long time. The good news is that you have many options available when it comes to the material, style, color and finish of your siding. But before you install it, learn about the different types of siding to help you understand which one will work best for your needs and budget.
For example, wood clapboards are made from pieces of cut lumber and glued together. They are durable and can add a natural beauty to your house. They are also easy to clean and maintain. Wood is a renewable resource, and unlike vinyl, it doesn’t contain harmful chemicals. However, if not properly maintained, it can be damaged by water, sunlight and pests. Fiber cement board is a popular alternative to wood and has many of the same benefits as wood without the risk of damage or warping. It also resists rot, mold and insect infestations.
Another option is composite wood, which combines recycled materials with a resin binder to create boards that are resistant to moisture and rot. It is easier to install than traditional wood, and it is considered environmentally friendly since it reduces the need for widespread tree clearing. However, it is not as strong as wood and may be susceptible to termite infestation and fungus.
When you’re ready to start installing the siding, be sure to follow the manufacturer’s instructions. Avoid common mistakes that can weaken or even void your warranty.
Start with the soffit and fascia, which should be sheathed before you begin installing the actual siding. Use a J-channel along the inner edge of the soffit to ensure a proper seal and protect the joists from rain. You can also sheath the soffit under the gutter to prevent water and snow from backing up against it.
Once the sheathing is installed, nail a strip of plywood to hold the first course of siding. This will be your starting point and serve as a guide to make sure you’re keeping the wall straight.
Finishing the Job
Aside from being a visual enhancement, your new siding will also protect your home from pests and moisture. The key to this protection is proper installation. This includes the use of starter strips and corner posts, along with the careful cutting and attachment of each individual panel. Attention to detail during the installation process also helps prevent leaks and ensures that your new siding will last as long as possible.
Prior to starting the project, the crew will prepare a work area by removing any obstacles that may hinder their progress. This includes trimming or tying back any bushes or plants and clearing the area around the house for easy access. This prep is especially important if the project involves soffits or fascia.
After the work area has been cleared, it’s time to start installing the siding panels themselves. The crew will begin at the back corner of your home and work their way towards the front, always leaving a quarter inch of space between each panel and the next one. The panels will then be nailed into the OSB using hot-dipped galvanized coil nails or 16 gauge finish nails, which are resistant to rust and sturdy against harsh weather conditions.
The siding will be custom fitted around any obstacles, such as faucets and utility equipment, to provide a clean look. Additionally, J-channel can be installed around gable ends to allow for expansion and contraction of the siding. Once the siding has been properly installed, it will be caulked to prevent water infiltration and maintain a polished appearance.
As the siding is being installed, you will notice a specialized crew responsible for caulking and painting. These two areas will be the last components of your siding project to be completed, and it is important that they are done right. The caulking will be done with a high-quality, moisture-resistant sealant, while the paint will be applied with a durable enamel paint. This is what will keep your vinyl siding looking great for many years to come!