A new roof can add value to your home, especially in a seller’s market. The upfront investment can be offset by the added value and reduced maintenance costs of a durable material.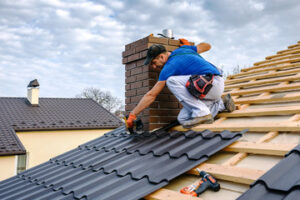
Choosing to replace your roof gives you the freedom to choose materials that align with your aesthetic preferences and other goals like improved energy efficiency. Keep reading the article below to learn more about Roof Replacement.
Purchasing a new roof is one of the most significant investments you will make as a homeowner. Whether you are replacing an aging roof with energy-efficient materials or repairing damaged roofing components, the total cost of your project will vary based on several factors. Having an idea of what the average cost of roof replacement is can help you budget accordingly.
The size of your roof is the primary determining factor for the cost of a new roofing system. A larger roof requires more material and labor, resulting in higher costs.
Also, the type of roofing materials you choose will impact your roofing cost. Asphalt shingles are the most common and affordable option, while premium roofing materials like metal or slate can increase your roof replacement costs significantly.
Other factors that can influence the cost of your roof include the number and layout of vents, chimneys, skylights, and other roof features. These additional pieces require specific materials to properly seal and protect the roof deck from leaks. In addition, if the existing vents are not functioning properly, you may want to replace them with new ones as part of your roof replacement project.
When you’re determining the overall roof replacement cost, you should keep in mind the costs associated with the tear-off and disposal of your old roofing materials. The disposal fee is a significant expense that must be factored into the final roof replacement quote. Also, be sure to consider the cost of obtaining any necessary permits and inspections for your roof replacement project.
The time of year you schedule your roof replacement will also have a significant impact on the total cost. During peak seasons, contractors’ rates will be higher due to increased demand. If possible, try to schedule your roof replacement during the off-season to save money on both labor and materials. Lastly, be sure to leave 15-20 percent of wiggle room in your budget for unexpected costs that may arise during the course of the project. This will give you peace of mind that you will be able to complete your roof replacement project within your budget.
Time
The time it takes to complete a Roof Replacement is one of the most important considerations for homeowners undertaking this significant home improvement project. The integrity and longevity of a home often depend on the condition of its roof, a critical barrier against environmental elements like rain and sunlight. Understanding the factors that influence this timeline can help homeowners set realistic expectations about how long the process will take and prepare accordingly.
The overall size of a roof and the material it is made from will impact how long it will take for professionals to remove and install new roofing materials. It will also depend on the weather conditions and whether the roof needs to be repaired or replaced.
A roof is comprised of many components including the original structure, decking, underlayment, and a layer of tiles or shingles. Each of these layers requires time to tear off and install properly. It will also take time to install gutters if needed.
Other factors that can extend the timeline for a roof replacement include the complexity of the work and the access to the roof. Homes with extensive landscaping, high fences, or architectural features that restrict the view of the roof can make it more challenging to get to and access the roof. This may require additional days to accomplish the work.
It can also take longer if the existing roof is damaged or requires repairs to the underlayment or the structural frame. This can add to the total roof replacement timeline as these repairs need to be completed before installing the new roofing materials.
If a roof has accumulated substantial storm damage that requires repairs before the installation of new roofing materials, this can also increase the timeline for the project. This is especially true if the repairs are significant and if there is underlying structural damage that is discovered.
It is also helpful to consider the timing of a Roof Replacement during a season when rain is less likely. This will help to avoid delays in the completion of the project. Professional contractors will monitor weather forecasts and work with clients to schedule projects during the best possible conditions for completing the job.
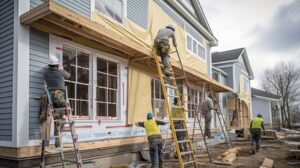
Materials
A new roof can greatly increase the curb appeal of your home. It can also add value, especially in Murfreesboro’s competitive real estate market. But before you choose a roofing material, consider its durability and lifespan. For instance, asphalt shingles typically last 15 to 20 years. If your shingle roof is approaching the end of its lifespan, a replacement might be a wise investment. In addition, modern roofing materials have better aesthetics and are more energy efficient than older shingles. They reduce heat absorption and lower air conditioning costs, making them a good choice for homeowners.
The cost of a roof replacement is affected by the type of roofing materials used and the complexity of the project. The most common roofing materials include shingles, sheathing boards and rafters, flashing, underlayment, ventilation products, chimney caps, hip & ridge caps and caulk. Shingles are the most important component of any roof, and they come in a variety of styles, colors and materials. Some types of shingles are more expensive than others, but most are available at affordable prices.
Sheathing is a type of board or sheet that supports the shingles and is an essential part of a roof’s structure. Underlayment is a layer of protection between the sheathing and shingles, and it helps to prevent water intrusion. Flashing is a series of metal pieces that seal the seams between the sheathing and shingles. It is installed in areas such as valleys and eaves to prevent water leakage. Ventilation products include ridge vents and can vents, which improve the performance of your roof by keeping it cool and dry. Hip and ridge caps protect the roof’s edge and are installed where two different slopes meet. Caulk is a waterproof sealant that can be used on any roof to prevent leaks and help it last longer.
During the process of roof replacement, it is important to remove all existing shingles and sheathing. Removing only part of the roof can be detrimental to its integrity and may void any manufacturer warranties. In addition, it can lead to water damage and other issues down the road. Once the old materials are removed, the sheathing and underlying structures can be repaired or replaced as needed.
Insurance
Many homeowner’s insurance policies cover roof damage caused by natural disasters and other perils. Homeowners can also purchase specific coverage for roof replacement. Regardless of the type of policy, it is critical for homeowners to review all policy details and exclusions. Understanding policy limitations can save homeowners time and stress when it comes to navigating the insurance process.
When a homeowner files a roof claim, an insurance adjuster will visit the property to conduct a thorough inspection. The insurance adjuster will then verify the roof damage and approve or deny the claim. Having a professional roofing contractor on-site can help ensure the insurer is receiving an accurate and fair evaluation. The roofing contractor can provide the insurance adjuster with a detailed quote for the repair or replacement costs and also document any additional damages, such as damage to insulation or walls.
Once the insurance adjuster has approved the claim, the insurer will send the homeowner a check to cover the cost of the roof repair or replacement. The amount of the check depends on the type of policy and whether it is based on actual cash value or replacement cost value.
With replacement cost value, the insurer will pay to bring the roof back to its original condition using new materials at today’s prices. This option gives the homeowner peace of mind that their roof will be restored to its full value without having to worry about rising material or labor costs. However, it is important to note that replacement cost coverage usually has a higher premium than actual cash value coverage.
Actual cash value, on the other hand, pays to replace the old roof with comparable materials at today’s cost, less the deductible. This option offers the homeowner predictability and lower premiums, but it does not provide as strong of a protection against increasing material and labor costs.
Regardless of which type of insurance coverage is chosen, the homeowner must remember that home insurance is designed to protect against sudden and unexpected disasters, such as storms. The wear and tear that occurs over the course of a normal lifespan is considered to be homeowner responsibility, and will not be covered by home insurance.